 This month's Garden Bloggers' Design Workshop at Gardening Gone Wild is on Coping with Slopes. Given that my whole property is one big downward slope, I look forward to reading others' posts.
.
When we were house hunting back in 2001, I was only a beginning gardener. I had dabbled with gardening in Brooklyn, but wasn't so serious that how I would garden on this property's slope wasn't even a consideration. Once I got more serious about gardening, I wished for a flat property, but worked with what I had.
.
Here are a few prior posts about my experiences:
.
1. Five Ideas for the Downward Sloping Front Yard
2. Creating the Egg Garden on my Front Slope
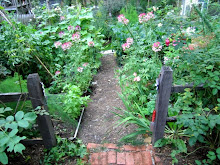
3. Goldberry Hill Last Summer (pictured above)
4. Goldberry Hill Last Spring
5. How to Build Raised (Vegetable) Beds on a Slope
6. How to Build a Children's Playhouse (Fort) on a Slope
.
For a map of how the gardens are situated on the property, click here. If I have more time, I'll write some additional posts about a few more of the sloped areas: Lilac Hill and the new stone staircase to the backyard.
Wednesday, October 21, 2009
Coping with Slopes - Gardening Gone Wild's Garden Bloggers' Design Workshop
Friday, August 28, 2009
Garden Bloggers' Design Workshop: Time in the Garden
This month's Garden Bloggers' Design Workshop at Gardening Gone Wild is on Time in the Garden. I love the kick-off photos on the post, as gardens are never "done" and always evolving, season to season, and year to year. Thinking through posts and photos that I could use to contribute to this subject, the best I have to offer is a post from last year, "Heirloom Gardener's Four Year Makeover of Her Front Garden - How to Improve Boring Suburban Landscaping," with pictures of the significant changes made from 2004-2008, including the replacement of a pathway and the continuation of a stone staircase to the front door. The foll0w-up post, "Front Yard Garden Design Challenge - Five Ideas For the Downward Sloping Front Yard," provides updated pictures from 2009, including the plantings that were added around the new hardscaping. Here are some of the "before" and "after" shots from those posts:
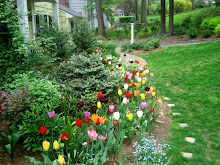
 The Front Garden, 2004
 The Front Garden, 2009
 The Egg Garden, 2004
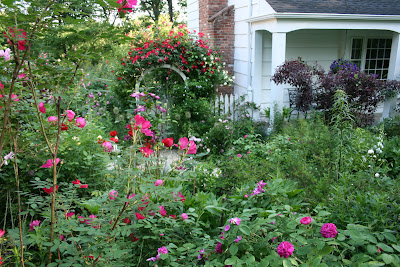 The Egg Garden, 2009
Friday, June 19, 2009
Front Yard Gardening Design Challenge: Five Ideas for the Downward Sloping Front Yard Garden
This month's Garden Bloggers' Design Workshop at Gardening Gone Wild is on Front Yards. This was one of the topics last year, and given what a common design challenge it is, they've decided to revisit it. Last year, I posted the saga of how I've continued to change my front yard garden from something that was once unremarkably suburban to a series of mixed borders. You can read that prior post here. For this year's workshop, I thought I'd share some hard-earned lessons on a particular design challenge that I've faced, but is not usually addressed in gardening books or magazines: the downward sloping front yard garden.
.
If I tell you that I live on a hill, then you probably imagine a house on the top of a hill. If you don't have a flat front yard, it's more likely that you have an upward sloping one. But what if you have a downward sloping one? How can you make it as beautiful and as inviting as any other? Here are some of the design elements that have worked for me:
. 1. Add a street-level garden to beautify your neighborhood and add some privacy. While I can appreciate a beautifully manicured lawn, it just doesn't provide the same effect when you live on a downward slope. I have a small section of lawn between the street and a mixed border, which is the top of a garden that extends down the slope to the driveway, called Goldberry Hill.
. 2. Add a staircase to your front door. An important element for all front yard gardens is to be welcoming to visitors. One of the best ways to do that is to make it an easy and obvious way to get to your front door. When you live on a downward slope, the best way to do this is to add a staircase. We have a bluestone staircase, which I love: it is weather-proof and will last forever, it is not slippery when wet, and it aesthetically blends in with the garden. There are plantings on either side of the staircase.
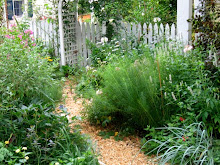
. 3. In the limited flat space in front of your home, add deep beds. From the street, or as you walk down the staircase, it is these deep beds that you and your visitors will see. Even if you live on a downward slope, your builder had to level out some space for your home. This is your opportunity to garden like everyone else.
. 4. Extend the deep beds in front of your home up the slope, where possible. At the far end of my home, there used to be a large, overgrown evergreen that dominated the landscape and made it difficult to get to the backyard. In that space, we added an oval-shaped garden, called the Egg Garden. Because it is at the far end and unobstructed by the driveway, it has grown each year, such that it has now started to extend up the slope. You can read a longer post about the creation of the Egg Garden here.
. 5. On the part of the slope that faces the house and is invisible from the street, add private beds. The best thing about having your house on the downward part of the slope is that it can feel more private. I can sit in my living room and look out onto the garden on the slope, called Goldberry Hill, instead of just looking directly at the houses across the street.
.
Related posts: Heirloom Gardener's Four-Year Makeover of Her Front Garden and The Egg Garden in June: Replacing the Overgrown Evergreen in the Front Corner of Our Home with a Mixed Bed
Monday, June 08, 2009
The Egg Garden in June: Replacing the Overgrown Evergreen in the Front Corner of our Home with a Mixed Bed
When we moved into our home, there was an enormous evergreen shrub planted in one of the front corners of our home. Perhaps it started off as a nice, tame shrub, but by the time we moved in it was almost as tall as the house and so wide that it made it uninviting to walk from the front yard to the back yard.
.
Looking around, having a large, overgrown evergreen planted at the front corner of your home appears quite common. Perhaps the builders planted them with the houses several decades ago. And once they have grown, people, even if they don't particularly like them, are reluctant to remove them.
.
After we cut ours down, there was a giant empty oval where it once stood. From that oval, the Egg Garden was born. It was originally not much larger than shadow of the old shrub, but over time, it has continued to grow at the expense of the front lawn. (For a complete map of the gardens, click here.)
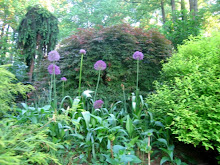
 The Egg Garden from the top of the hill.
 The Egg Garden from the door of the arbor.
Sunday, March 29, 2009
How to Protect Vegetables from Groundhogs, Rabbits and Squirrels, Part 1: A Chicken Wire Raised Bed Cover
 Dear Messrs. Groundhog, Rabbit, and Squirrel,
My friends over at Gardening Gone Wild asked me to write to you to discuss the status of our current dispute. While I have such a harmonious relationship with so much of the other wildlife in the garden--the birds, the toads, the salamanders--I regret that our relationship has become so acrimonious, particularly as it relates to the vegetables.
While I am flattered that you like the vegetables as much as (or perhaps even more than) we do, I find that your appetites leave something to be desired, namely leftovers. Last year, the garlic spray kept you away from many of the vegetables, but I was disappointed to still find teeth marks on my vine-ripened tomatoes and zucchinis, not to mention the fruitless pumpkin and watermelon vines whose flowers you devoured. I can no longer bear your rude interruptions. In response, I have asked my dear husband to make a simple, custom-fit chicken wire vegetable box cover to keep you away. What it lacks in aesthetic contribution to the garden, I hope it makes up in efficacy. In the future, please find food elsewhere in the wild or, if I may be so bold to suggest, cultivate your own vegetables.
Best wishes,
Heirloom Gardener
.
UPDATE: Part 2 of this series discusses adding chicken wire around the post and rail fence. Part 3 of this series discusses reinforcements to chicken wire raised bed cover after a break-in.
.
Related posts:
- Advice Wanted: How to Keep Rabbits Out of the Garden
- Keeping the Deer Out of the Backyard: the Deer Fence
- Keeping the Groundhog Out of the Cutting Garden
- Organic Pest and Fungus Control: Garlic Barrier - Yes, It Really Works
- Organic Rose Gardening: Dormant Oil Application for Pest Control
- Organic Pest Control: Colorado Potato, Threelined Potato, and Japanese Beetles
Sunday, February 15, 2009
Pets in the Garden: Five Reasons Why Cats Are Great for Gardeners
 This month's Garden Bloggers' Design Workshop at Gardening Gone Wild is on Pets in the Garden. Of course, I think I have the best cat in the world, but who doesn't think their pet is the greatest? His name is Luna (yes, a little feminine for a tom cat, but we first thought he was a she). For anyone who has any question about whether cats are good for gardeners, here are five reasons why I think cats are perfect for gardeners:
1. Pest Control. My cat has significantly reduced the number of pests in the garden. He is about 18 months old and as he has grown older, his prey has grown larger--he started with small field mice and voles, moved up to chipmunks, and recently caught a squirrel. And for each one he catches, I am sure he scares off many more. I'm hoping he can catch or at least scare off the rabbits, though I'm afraid the groundhog is wishful thinking.
2. Companionship. When out in the garden, my cat follows me around. He quietly observes what I am doing and then wanders off, but always come back.
3. Gentleness. Unlike those other four legged pets that like run through and dig in the beds, my cat is very, very gentle. Yes, he does occasionally chew on some of the ornamental grasses, but pretty much leaves everything else alone.
4. Litter Box Trained. My cat is litter box trained and goes into the house when he has to go. While I've never noticed any unwanted deliveries in the garden, we do keep a cover on the sandbox, just to be safe.
5. Child Friendly. Of course, my children love the cat and the cat is quite friendly with them. He lets them hold him and pet him and doesn't even mind when my toddler tries to boss him around.
Monday, January 26, 2009
How to Keep Track of What Plants You Have Bought, Where They are Going, and What You Still Need to Buy: The Garden Planning Binder
This month's Garden Bloggers' Design Workshop at Gardening Gone Wild is on Labeling and Record Keeping. Like many of the other bloggers, I have tried many different methods of labeling and record keeping with varying degrees of success over the years. For example, I tried the wooden and metal markers, but I didn't like how they looked in the garden, so I no longer use them. In recent years, I have settled on three means of record keeping: the Garden Journal, the Garden Planning Binder, and the photographs of my garden.
~
In terms of the Garden Journal, I wrote a separate post about it last year that I won't repeat in full here: "I find the garden journal is an invaluable tool to help me keep track of my garden and plan for the future. I started keeping a garden journal about six years ago. Before then, I would keep notes at random on successes, failures, and sources of inspiration. These I would easily misplace and forget about."
~
I used to try to keep track of absolutely everything in my Garden Journal, but one aspect of my record keeping kept slipping through the cracks: what plants I had ordered, where I planned to plant them, and what I still needed to buy. I would print out my online orders and put them in a file folder to read alongside my Garden Journal, but it was just too disorganized. Boxes of plants that I had ordered in the fall and winter would arrive on my doorstep in the spring and I would forget why I had ordered such and such a plant and/or where I planned to plant it. Sometimes I would remember the space I was trying to fill, but other times I would not and need to find a home for it. At some point later in the season, the intended space would present itself and I'd remember what I had planned to plant there, causing me to move the plant or change the plan.
~
My Garden Journal needed a friend. Thus, the Garden Planning Binder was born. I bought a large three-ring binder and anytime I ordered anything--trees, shrubs, bulbs, perennials, annuals--I would print out the order form, write down where I planned to plant it, punch holes in it, and put it in the binder. This works on purchases for my containers, as well as my beds. Also, by keeping all of the receipts together, I am better able to keep track of my budget. Now, when the boxes arrive in the spring, I just find the matching order in the Garden Planning Binder and immediately plant the plants where they are supposed to go.
***
One unrelated note about labeling dahlia tubers. If you over-winter dahlia tubers, here is one specific record-keeping suggestion: write the name of the dahlia on the actual tuber with a black Sharpie marker. I used to keep them in paper bags with the name of the dahlia on the bag, but I found that the paper bag disintegrated by the next spring.
Sunday, December 28, 2008
Garden Bloggers' Design Workshop on Kids in the Garden: What the Kids Say
This month's Garden Bloggers' Design Workshop at Gardening Gone Wild is on Kids in the Garden. As a gardener with five young children, my whole blog is in part about gardening with children. Some of the most popular posts on my blog have been the most explicit about the topic, including:
~
 "My favorite thing in the garden is making flower arrangements. I like putting different flowers together. My favorite color is pink, so a lot of my vases have pink in them. One of my favorite plants is the hibiscus, but the flowers only stay good in a vase for one day. Phlox are good too."
 "My favorite thing in the garden is harvesting vegetables. There are so many different ones to find in the vegetable garden. My favorites to harvest are the tomatoes."
 "My favorite thing about gardening is looking at the flowers. Some of my favorite flowers are daffodils, tulips, and muscari. Muscari is my favorite because it looks like it has bells."
Monday, November 24, 2008
Five Tips for Growing Edibles with Children

This month's Garden Bloggers' Design Workshop at Gardening Gone Wild is on Edibles in the Garden. While I am primarily a flower gardener, I do grow edibles in a dedicated vegetable plot, as well as in my mixed borders and containers. Given the size of my suburban lot, I cannot expect to grow enough to feed my family, but what I do grow is a lot of fun. Here are five tips for gardeners who want to attract those beneficials otherwise known as children.
~ 1. Grow fruits and vegetables that you can pick and eat directly from the plant. What child can resist the instant gratification of eating sweet sugar snap peas straight from the vine? The children always eat the ripe cherry tomatoes off the vine before I can ever get to them. They also love the fresh figs off the tree that I grow in a container on my deck. Strawberries, blueberries, raspberries, blackberries and the wild wineberries are other favorites.
~
 2. Grow vegetables that your children can plant, tend and/or harvest. This takes a little more effort on the part of mom than the former suggestion, but children can learn a lot from planting, tending and harvesting vegetables too. It's really amazing for a child to plant a seed or seedling, water it, watch it grow, tend it, and harvest it. This year, my children helped plant almost all of the vegetables and took particular pleasure in harvesting the asparagus, lettuce, eggplant, zucchini, tomatoes, cucumbers, corn and potatoes.
 3. Grow heirloom varieties that you can't buy in the grocery store. As you can tell by the name of my blog, Heirloom Gardener, I am particularly interested in plants that our grandparents and prior generations grew. While these varieties aren't typically available as seedlings at your local nursery, you can buy an almost infinite variety through online and offline catalogs and seed exchanges. The children find the variety and novelty of them quite interesting. Some of my children's favorites this season were the lemon cucumbers (they are about the size and color of a prickly lemon) and the German stripe tomatoes (mostly yellow with a spot of orange on one end).
~
 4. Grow edibles with which they can play. In addition to using some of the above vegetables for playing store, the children have also found other ways to play with the edibles. For example, they love using the hollow stems of chives and lovage as drinking straws. Also, they have made up a drink with the fresh mint, which is made of crushed mint leaves, sugar, and sparkling water.
~
 5. Grow flowers that are also edible. The children find it quite amusing that some flowers are edible. They particularly like including pansies, marigolds, calendula, and nasturtium flowers and leaves in our salads with mixed greens or as garnish.
~
Related posts:
- How to Build Raised Beds (on a Slope/Hill)
- Organically Preparing the Soil for Planting
- How to Make the Perfect Soil Mix for Seed Sowing
- Farmer's Almanac Spring Planting Schedule (May)
- Farmer's Almanac Spring Planting Schedule (April) and Heirloom Seed Sources
- How to Plant Corn the Way Squanto Taught the Pilgrims
- How to Plant Potatoes and Harvesting Asparagus
- My Eight Year Old Son's Great Potato Harvest
- Organic Beetle Control with Children
- Ten Tips for Planning a Children's Garden
- Creating the Children's Garden
Thursday, November 06, 2008
A Lattice Screen to Hide My Gardening Supplies and Grow Clematis
Back in August, the Garden Bloggers' Design Workshop at Gardening Gone Wild focused on Trellises and Screens. I didn't get around to contributing at that time, but one thing that Nan wrote in the wrap-up compelled me to add something to the conversation.


In addition to those beneath my deck, I have trellises and screens in two other parts of my garden: (i) in the Cutting Garden next to the chimney (pictured below) which provides a place to grow the vigorous rose Complicata and (ii) on the deck in containers to provide privacy from the next door neighbors on which I grow annual vines (this year, I grew Moon flowers).

Thursday, October 09, 2008
Garden Bloggers' Design Workshop: Sheds and Outbuildings
 This month's Gardening Bloggers' Design Workshop at Gardening Gone Wild (one of my favorite places to share ideas with other gardeners) is on sheds and outbuildings. As much as I love sheds and outbuildings, the limitations of space and slope allow me only one, the fort (or playhouse) that is pictured here earlier this summer.
In a prior post, I wrote about how we built it from scratch: "The entire project took about a month, mainly on weekends. The total cost of the materials was approximately $700. My husband did all of the work himself, except the cutting and installation of the walls which he did with a friend on a single afternoon."
Friday, July 25, 2008
Garden Bloggers' Design Workshop on Garden Whimsy: Guard Frogs and Garden Names
I missed last month's Garden Bloggers' Design Workshop on Porches and Decks because I was just too busy gardening! This month's Garden Bloggers' Design Workshop at Gardening Gone Wild is Garden Whimsy. The truth is I don't think I have too many whimsical elements in my garden, but then two ideas came to mind: the entrance to the Children's Garden and the names of my garden rooms. Guard Frogs. Just like the lions Patience and Fortitude that stand at attention in front of the entrance to the New York Public Library, the children placed these two stone frogs in front of the entrance to their garden.
 The stone frogs are a couple of inches tall and wide--large enough to notice, but not too large to take away from the plants. Also, they are a representation of an animal we like, as I have prohibited statuary of all garden pests--rabbits, squirrels, etc.
Garden Names. In a prior post, I included a map of my garden. For planning purposes, I name each of the garden rooms, which is not whimsical in and of itself. The whimsy, which is more of an inside joke than an external display, is that the garden rooms have names that are aspirational to a much larger or grander property, such as the Long Border that is not too long, the Great Lawn that is modest in size, and the Walled Garden that lacks a proper wall but is rather made up of stones that I dug up from the beds. While I do take my gardening seriously, it's good not to take it too seriously.
Thursday, May 22, 2008
Garden Bloggers' Design Workshop: Stone in the Garden
I love stone in the garden. It is the perfect complement to all of my plants. As a part of this month's Garden Bloggers' Design Workshop over at Gardening Gone Wild, here is a brief post about how I have slowly replaced man-made materials with stone throughout my garden.
~ 1. The Bluestone Paths, Stairs, and Walls. If you garden on a hill, a stone staircase cannot be beat for practical and aesthetic reasons. They are beautiful and maintenance free. Compared to the small staircase of railroad ties that I have in a less prominent part of the garden, the stone staircase is much more attractive and will never need to be replaced.
~
 2. The Pebble Path. I love pebble paths, but it is difficult to have them when you live and garden on a slope, as I do.
~
 3. The Dry Laid Walls of Native Stones. If you have ever visited my region of New Jersey, you will see orange rocks everywhere: on the sides of the road, on the edges of properties, and even on the edges of garden beds. Every time I try to dig a hole, they are waiting for me: small, medium, large, and even giant-sized orange rocks. And unlike those beautiful, grey rocks that can be handsomely stacked into walls, these rocks are so unshapely that it's impossible to dry lay them more than one or two layers high, which is exactly what I did to create the walls in my Walled Garden.

Wednesday, April 30, 2008
Garden Bloggers' Design Workshop: Heirloom Gardener's Four Year Makeover of Her Front Garden - How to Improve Boring Suburban Landscaping
April's Garden Bloggers' Design Workshop on Front Yard Gardens is very timely for me seeing that my spring project was to complete the four year redesign of our front garden, which is made up of the Front Border immediately in front of the house and, standing in front of the house to the immediate left, the Egg Garden.


 .
.~
~
The project is just about complete now. I will have to see how the plants grow in before I add more to the new plantings. In the fall, I will plant more spring blooming bulbs.


Blogflux


