This month's Garden Bloggers' Design Workshop at Gardening Gone Wild is on Front Yards. This was one of the topics last year, and given what a common design challenge it is, they've decided to revisit it. Last year, I posted the saga of how I've continued to change my front yard garden from something that was once unremarkably suburban to a series of mixed borders. You can read that prior post here. For this year's workshop, I thought I'd share some hard-earned lessons on a particular design challenge that I've faced, but is not usually addressed in gardening books or magazines: the downward sloping front yard garden.
.
If I tell you that I live on a hill, then you probably imagine a house on the top of a hill. If you don't have a flat front yard, it's more likely that you have an upward sloping one. But what if you have a downward sloping one? How can you make it as beautiful and as inviting as any other? Here are some of the design elements that have worked for me:
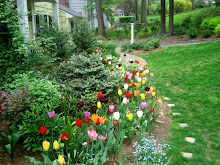
. 1. Add a street-level garden to beautify your neighborhood and add some privacy. While I can appreciate a beautifully manicured lawn, it just doesn't provide the same effect when you live on a downward slope. I have a small section of lawn between the street and a mixed border, which is the top of a garden that extends down the slope to the driveway, called Goldberry Hill.
. 2. Add a staircase to your front door. An important element for all front yard gardens is to be welcoming to visitors. One of the best ways to do that is to make it an easy and obvious way to get to your front door. When you live on a downward slope, the best way to do this is to add a staircase. We have a bluestone staircase, which I love: it is weather-proof and will last forever, it is not slippery when wet, and it aesthetically blends in with the garden. There are plantings on either side of the staircase.
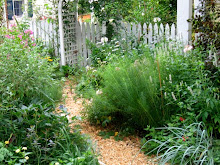
. 3. In the limited flat space in front of your home, add deep beds. From the street, or as you walk down the staircase, it is these deep beds that you and your visitors will see. Even if you live on a downward slope, your builder had to level out some space for your home. This is your opportunity to garden like everyone else.
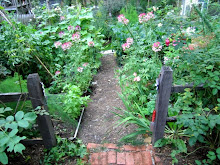
. 4. Extend the deep beds in front of your home up the slope, where possible. At the far end of my home, there used to be a large, overgrown evergreen that dominated the landscape and made it difficult to get to the backyard. In that space, we added an oval-shaped garden, called the Egg Garden. Because it is at the far end and unobstructed by the driveway, it has grown each year, such that it has now started to extend up the slope. You can read a longer post about the creation of the Egg Garden here.
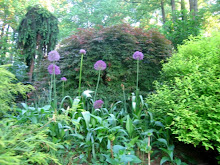
. 5. On the part of the slope that faces the house and is invisible from the street, add private beds. The best thing about having your house on the downward part of the slope is that it can feel more private. I can sit in my living room and look out onto the garden on the slope, called Goldberry Hill, instead of just looking directly at the houses across the street.
.
Related posts: Heirloom Gardener's Four-Year Makeover of Her Front Garden and The Egg Garden in June: Replacing the Overgrown Evergreen in the Front Corner of Our Home with a Mixed Bed
Friday, June 19, 2009
Front Yard Gardening Design Challenge: Five Ideas for the Downward Sloping Front Yard Garden
![]()
![]()
Subscribe to:
Post Comments (Atom)
Blogflux


21 comments:
Just beautiful!
You've done a wonderful job with your front yard. It's gorgeous!
Hi there. This was a great post to read, and I especially enjoyed following the links to other places in your blog. The evolution of your gardens is very interesting indeed. I also went and visited the post about your Egg Garden, and the one about the Deer Fence, and the previous design workshop post on this subject.
I wish I had a hill to garden on. Any slopes at the Havens were created by us!
From one gardener (A fairly new one too at quite an advanced age!)to another, this is simply lovely!
I followed the link from the Egg Garden to this post. This has some great points, even for those of us who slope in the opposite direction.
I enjoyed reading this post. You have found excellent ways to manage your slope. Your gardens are beautiful, so full and lush!
Oh my - how did I miss leaving you a comment on this wonderful post earlier? Sorry about that. It's a beautiful and inspiring story that's suited for several of the GGW Design Workshops. Thanks so much for sharing this with us!
OMG, I didn't realize you had such a tough slope to work with. I wonder how I missed this important bit of information?? Anyway, you have just worked wonders with this difficult situation. I like the aspect of privacy. I have planted all around our house too. It is on a busy corner. I like my privacy despite people passing by going to the local wal mart and during the school year all the students going to the big local highschool pass by too. UGH... I have achieved a quietude. I am grateful for that. I would love to have more color in the garden though. I look at your colorful garden and sigh longingly.
You've done a wonderful job! I hope someday I can have gardens that look like that!
I noticed your paving stones & was wondering if that was the primary walk up to your house??
I ask because I have to replace the sidewalk up to my front door & the cheapest/nicest looking method would be paving stones but I hesitate because I don't know how it'd be to shovel snow off of in the winter.
I love all the pictures of your flowers - I've been emailing them to my Mom & it's really been brightening her day!
Sam,
We previously had paving stones, but replaced them with the bluestone for two reasons:
1. The paving stones became uneven and were a hazard to walk on.
2. The bluestone was more aesthetically pleasing.
Both were fine in the snow, but neither is smooth for a shovel, so you need to remove most of the snow and then add salt or an ice melter to prevent a build-up of ice.
However, the bluestone was significantly more expensive.
You can read more about the bluesteon on this post:
http://heirloomgardener.blogspot.com/2008/05/garden-bloggers-design-workshop-stone.html
-Heirloom Gardener
Thanks for your response.
I'll definitely avoid the paving stones then. There's a small quarry & landscape rock place not far from our house - I'll see what they have there for rock. Being a local quarry they might be cheap.
Thankfully it's a short walkway that I need to tackle - maybe 10ft so I might be able to pull off stone. I've had quotes for a regular cement walk so I at least have numbers to compare the cost of stone to.
That is beautiful blue stone & the pebble path looks nice too.
Have a good afternoon :-)
I live at the bottom of a slope so that several neighbors rain water all flows to my yard. All my soil keeps washing away and plants are dying. I have to put in more dirt and mulch several times a year. Other than a major ditch to catch the water and put in drainage pipes, I can't see a solution to this problem. Do you have any ideas?
Thanks,
Missy
I have kinda the same problem. Last week I had a structural engineer (friends husband) at my place and he had a novel idea instead of a ditch or french drain - he told me to put paving stones down in such a way that they'd slope the water off into the drive way. He said it's need to be a 2ft drop from my back yard to my driveway (probably about 1000 ft)
He said there's two ways to figure the slope:
One was to dig & put the line of pavers in and then turn on the garden hose to see if the water runs the desired direction.
The other was he said to run a level string on stakes from the beginning point to the end point and measure down at the end point - 2ft from the string and then work my way back putting each paver in a little higher then the previous & using the string to measure as needed.
I don't know if that makes sense - I need more coffee yet this morning & I don't have my 2 pages of notes from him with me.
One other idea is my brother ran PVC pipes with holes drilled in the top under 3 sides of his yard to help drain water form the house - he put the dirt & grass back over it so you can't tell it's there unless you notice the drain pipe sticking out. Too much work for me but, if the paver idea doesn't work well enough then I'm going to try that.
PS - the pavers I'm talking about are 1ft by 2ft ones, not ones the size of a regular brick although regular brick would probably work - just be more narrow.
Replacing a traditional manicured lawn with a mixed border at street level creates a buffer. This "Goldberry Hill" garden beautifies the neighborhood while providing privacy for the home, which sits lower than the road. Check out more info from Concrete Contractor Augusta
Instead of a standard lawn, the author suggests planting a garden at the street level. This "top" layer beautifies the neighborhood, provides immediate curb appeal, and creates a sense of privacy for the house tucked below. Concrete Company Port Saint Lucie
Instead of a traditional lawn, create a mixed border right at the street level. This adds immediate curb appeal and creates a "top layer" for the garden that flows down the hill, while also providing a sense of privacy from neighbors. Fence Company Augusta GA
Make the front door accessible and welcoming by adding a permanent, slip-resistant staircase. The author recommends bluestone for its durability and aesthetic appeal. Johnson City Fencing Contractor
Adding a mixed border near the street creates immediate curb appeal and offers privacy from neighborhood traffic. The author names her slope-side garden "Goldberry Hill." Learn more here about our Cedar city Fencing services
This article highlights the creative potential of replacing traditional lawns with productive edible landscapes that enhance curb appeal and sustainability. It offers practical inspiration for homeowners looking to navigate local ordinances while designing a functional and aesthetically pleasing front yard garden. Get more info about Concrete Patios
This article highlights the growing trend of transforming front yards into edible landscapes, emphasizing how food production can be seamlessly integrated into residential design. It offers insightful solutions for balancing aesthetic beauty with functional gardening while navigating common neighborhood landscaping standards. Your top Fencing contractor in Prattville AL
Post a Comment