Wednesday, April 30, 2008

Garden Bloggers' Design Workshop: Heirloom Gardener's Four Year Makeover of Her Front Garden - How to Improve Boring Suburban Landscaping

April's Garden Bloggers' Design Workshop on Front Yard Gardens is very timely for me seeing that my spring project was to complete the four year redesign of our front garden, which is made up of the Front Border immediately in front of the house and, standing in front of the house to the immediate left, the Egg Garden.

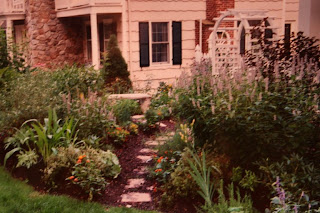
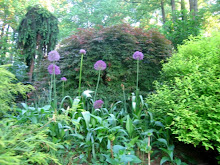
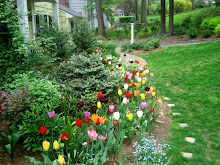
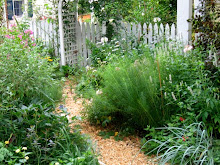
When we moved into our house, the front garden had the usual foundation plantings: evergreen trees and shrubs with two flowering trees for color. It was dull, static, and uninspiring. The first three pictures show the front border before I began replanting it.
.
.
.
.
.
.
.
.
.
.
.
.
.
To my neighbors' amazement, I proceeded to take out the whole thing and replant it myself. The first year, I replanted the existing borders and created the Egg Garden. The existing borders had three problems: they did not change with the seasons--summer looked the same as fall and spring, and winter was only slightly different; some of the plants had grown so large that they covered windows and were out of proportion with the house; and the borders needed very little maintenance which meant there was little gardening to be done.
~
I started by removing the large problem plants: the huge rhododendron which was out of proportion with our two-story colonial, the two amorphous evergreen cones flanking the front door, and a weeping cherry which obscured the windows of the library. Then I took away anything that was poorly suited for the site, like the leucothea in full sun, or that did nothing for the border, like a deformed Ceris 'Forest Pansy.' Next, I improved the soil by adding four inches of mushroom compost. Finally, I began replanting with small trees, shrubs, perennials, annuals, vines, grasses, and bulbs. I also added a bird feeder.
~
The Egg Garden was created almost entirely from the space that was formerly occupied by the rhododendron and is bordered in the back by the fence and arbor that enclose the Cutting Garden. Small six-by-six stepping stones through the grass connected the front walkway to larger, but not large enough, twelve-by-twelve inch stepping stones through the Egg Garden to the Cutting Garden.
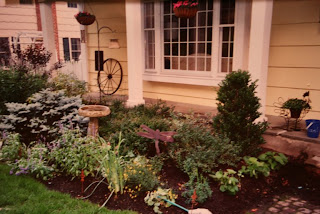


.
.
.
In the second year, I expanded both the Front Border and the Egg Garden, and spent time planting both more densely. I also decided to remove the bird feeder which seemed more appropriate in the backyard. In its place, I installed a tutuer on which I decided to grow the rose Lavender Lass and clematis Blue Bird and Francesca.
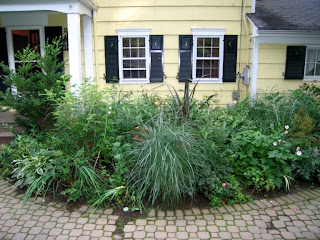
.
.
.
.
.
.
.
.
.
.
.
.
.
.
.
In the third year, I added a large pot and a semi circular boxwood hedge in front of the library, to give that area definition and a focal point. In the Egg Garden, I widened the path and replaced the twelve by twelve inch stepping stones with loose gravel. As always, I looked for ways to expand the floral display with more bulbs, clematis, and annuals.
.
.
.
.
.
.
.
.
.
.
.
.
.
.
.
This year, I am completing the final phase of the front border renovation. I replaced the old path of brick pavers with a wider one of irregular blue stone to compliment the other stone work in the garden. I also continue the blue stone stairs on the other side of the driveway. Previously, the steps took you from the mailbox to the driveway through Goldberry Hill. From there, you were expected walk down the driveway and then onto the entrance of the path leading to the front door. No one did this, not even me. One of the cardinal rules of my garden is that there should be paths where people walk.
~
Further on, in place of the small six by six inch stepping stones that connected the front path to the Egg Garden, there are now more appropriately sized two by two foot blue stones. Throughout, I chose irregular blue stone pieces to harmonize with the less formal plantings.
~
The borders in the front were also to be expanded to flank each side of the new stairs. I wanted continuity in plantings around the new steps and those already there, so that it would not be obvious that they were installed at two different times. I chose to use the same plants or plant types so that the steps would echo each other.
~
The project is just about complete now. I will have to see how the plants grow in before I add more to the new plantings. In the fall, I will plant more spring blooming bulbs.
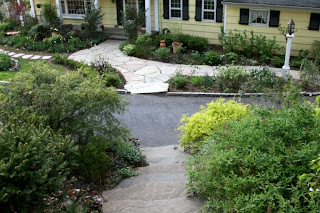

Thursday, April 24, 2008

Advice Wanted: How to Keep Rabbits Out of the Garden

I need some help and advice from my fellow gardeners. I have always had the occasional rabbit in the garden, but nothing too damaging. This year, I have a rabbit infestation and he or she is eating everything in sight. I wasn't sure who the culprit was, but then I saw the rabbit shamelessly eating my new plants in broad daylight. From what I've read, it seems that the options are guns (not practical in the suburbs), fences, traps (my husband's weekend assignment), dogs/cats (not an option right now), and repellents (I am currently spraying both commercial and home-made repellents). Some gardeners on GardenWeb also suggested spreading human hair, sprinkling pepper, and planting plants they do not like, such as nepeta (catmint). Does anyone have insight into which of these or additional suggestions will work?

Update April 25, 2008: May Dreams Gardens has a lot of experience with rabbits and suggests sprinkling cayenne pepper on the plants that need protection.

Update May 10, 2008: Thank you all for the suggestions--some of them are working. First, I sprinkled the cayenne pepper on the most susceptible plants and the rabbits are staying away from them. Second, I captured my first rabbit in a rabbit trap baited with one of their favorite foods--clover.

Related posts: Keeping Groundhogs Out of the Garden, Keeping Deer Out of the Garden

Thyme for Herbs: 10 Blogs That Have Raised The Bar On Garden Blogging

I was surprised and honored to be recognized by Jane Marie at Thyme of Herbs in her list of "10 Blogs That Have Raised The Bar On Garden Blogging." Janie Marie, thank you for your support and recognition!

Related post: Heirloom Gardener Featured on the Star-Ledger's NJ.com

Wednesday, April 23, 2008

A Visit to Chanticleer in Wayne, Pennsylvania: Spring Bulbs, Flowering Trees, and Inspiring Containers

I have never been to Chanticleer in the spring. Usually, things are too busy here with spring sports and gardening to go for the day; but with a clear schedule, we went. It was wonderful.

The most inspiring part of the visit was seeing all the containers. I often find spring pots hard to put together, but with a combination of colored branches from dogwoods and willows, climbing vines, leafy vegetables, and some flowering plants, each pot conveyed the fun and excitement of spring.
It was also good to see which annuals be set out early. Usually, I plant bulbs for most of my spring color in my beds, but I was inspired by Chanticleer to use some annuals such as the African daisy (Osteospermum) which can tolerate cool weather too.
Chanticleer's large drifts of bulbs (pictured) are a hint to the abundance of summer which will follow. I have not planted any bulbs in the lawn, but I'm thinking of doing so in the fall. My daughter loved that you could walk through the flowering bulbs as if they created a meadow. It is those kinds of romantic vignettes that make Chanticleer memorable.
In this trip, I was also able to see things which are more hidden later in the season. To see how hard they cut back their shrubs teaches me how much to cut mine back. I wanted to much a hill in our garden with pebbles, but I hesitated thinking that they would roll down. However, at Chanticleer there is a hill as steep or steeper than mine mulched with pebbles (pictured) and they are not all sitting at the bottom of the hill.

Tuesday, April 22, 2008

Wall Street Journal & New York Times: Suburban Farming and Kitchen Gardens

Today, the Wall Street Journal featured an article and a video about individuals who have started to farm their own and their neighbors' suburban lots for food. Kelly Spors writes:

"Since 2006, Mr. Nash, 31, has uprooted his backyard and the front or back yards of eight of his Boulder neighbors, turning them into minifarms growing tomatoes, bok choy, garlic and beets. Between May and September, he gives weekly bagfuls of fresh-picked vegetables and herbs to people here who have bought "shares" of his farming operation. Neighbors who lend their yards to the effort are paid in free produce and yard work."

Last week, the New York Times also wrote an article about the less-extreme resurgence of kitchen gardens. Anne Raver writes:

"During World War I, to save fuel and labor, President Woodrow Wilson had sheep grazing on the White House lawn. His wife, Edith, planted vegetables to inspire the Liberty Garden campaign, in which thousands of students, called 'Soldiers of the Soil,' grew their own food in their schools and communities, she said. As the Allied powers began to win, the name Liberty Garden was changed to Victory Garden...Just after Pearl Harbor, Ms. Hayden-Smith said, another Victory Garden campaign was started. Eleanor Roosevelt grew peas and carrots on the White House lawn, and by the end of the war, Ms. Hayden-Smith said, 'Americans were producing 40 percent of the country’s produce' in their gardens' (emphasis added)."

Sunday, April 20, 2008

Cut Flowers, Branches, and Foliage: Bringing Early Spring Into The Home

Cutting flowers from the garden is a beautiful way for me to bring the garden into the home. The flowers that we grow in the garden are incomparable to the ones at the florist or the supermarket. I thought this year I would keep of record of good cutting material--flowers and foliage. Almost anything can be used for arrangements, but often I overlook plants until I see a clever arrangement put together by someone else. So, please share with me the plants you like to cut and the combinations you enjoy.

~
1. Cut Flowers
~
I mainly have spring bulbs for cutting. These include snowdrops (first picture), crocuses, daffodils (first picture), hyacinth (second picture), and early tulips. All of the bulbs will last at least a week in water, if cut when they are just about to open except crocuses. Crocuses are short lived as a cut flower, lasting only several days. Daffodils I do not mix with other flowers because the sap which oozes out of the stem poisons other flowers. I have read that if you soak daffodils in many changes of water for many hours it renders them safe to mix with other flowers. I haven't taken the time to try this, so I don't know first hand how well it works.
~
The other flowers in my garden are hellebores (third picture), periwinkle, violets, and pansies (fourth picture). The violets and pansies are good for tiny vases. I will use antique shot glasses or small maple syrup bottles we've collected from Cracker Barrel.
~
2. Cut Branches
~
I cut my trees and shrubs also. Now I have cherries, pussy willow, serviceberry, forsythia, quince, cornelian cherry, and redbud. Magnolia flowers are wonderful to float. I don't cut branches from magnolias because they tend to throw up long vertical branches if pruned. Floating in water, the flowers only last one to two days, but to see them up close I appreciate their beauty all the more and I can pick a few everyday that they are in bloom.
~
3. Foliage
~
I love the freshness of the early spring flowers. Often I make vase of only one type of plant all together. However, if I want foliage filler, I have celandine poppy, pussy willow, and bleeding hearts. The celandine poppy is one of the few perennial plants that has a lot of leaves. This is a member of the poppy family, so sear the stems before placing stems in water. Bleeding hearts have both beautiful leaves and flowers. The flowers have not yet appeared, but throughout its three month stay in the garden I use bleeding heart leaves as filler in vases.
~

Wednesday, April 16, 2008

Garden Bloggers' Bloom Day - April 2008: Spring Flowering Trees, Shrubs, Bulbs, and More in New Jersey (zone 6b)

Cornelian Cherry Dogwood

Crocuses
Forsythia
Serviceberry
Daffodils and Crocuses on Goldberry Hill
Hyacinth in the Bird Garden
Virginia Bluebells
Brunnera Macrophylla
Daffodils in the Cutting Garden
Self-Seeding Pansies
Vinca Minor or Lesser Periwinkle
Winter Honeysuckle
Andromeda
Violet

Sunday, April 13, 2008

Gardening with Children: Ten Tips for Planning a Children's Garden

Creating a welcoming place for my children and their friends to play and enjoy nature while I pursue my favorite activity is one of the main goals as I develop my garden. After all, the more time they want to spend in the garden playing, the more time I get to garden. If you are planning a children's garden of your own, here are ten things to keep in mind.
.
1. Create areas that attract and encourage children to play. In the Walled Garden, my husband built an eight-by-eight foot sandbox. The kids love this, especially because its generous size allows them to build elaborate neighborhoods and landscapes in the sand. Also, around the sandbox is a sitting area for me to relax with them when I want. Adjacent to the sandbox is a digging area (pictured) that my children specifically requested. Children love to dig and get dirty and I do not want to find holes in my lawn or beds, so designating an area for this activity makes everyone happy.
.
Next to the digging area in the Walled Garden is the fort. Play houses are great outdoor spaces for kids to play and hide. They give children a place of their own within the garden and are the center of many make believe games. Other ideas for play houses that I have seen are weeping trees that can be used as hide outs, sunflower houses, and outdoor teepees. Children want safe places to hide that are secret, but are not scary by being too out of the way or too dark. It reminds me of the toddler that walks away from you, but continues to look back every few steps to make sure you're still there. Along a section of our fence I planted four Lyland cypresses (pictured) to screen out our back neighbor who just removed a bunch of trees in the back of their property. These cypresses have turned out to be great hiding places, often serving as the 'secret passage from one land to another' or the 'other room.'
.
2. Accommodate the spaces where children naturally gravitate. One of my children's unexpectedly favorite places to play hide and seek, cops and robbers, and other made-up games is the miniature woodland (pictured) of Goldberry Hill. Here I have planted various shrubs, trees, and evergreens. Along one side of this woodland are tallish evergreens and twiggy shrubs that provide cover and privacy from the street. The other three sides open into the garden. Being in suburbia, my children to do not have the joy of really playing in the woods, but this provides them with a small taste.
.
The area reminds me of the old fashioned shrubberies: it includes a climbing tree; shrubs which they can hide under like a mature weigela; airy, open evergreens that they can see through; and large, majestic white pines to sit under. The area is mainly planted with ground cover and daffodils. I keep the ground fairly clear of perennials so the children can fill free to run about among the trees and shrubs without any concern of stepping on small plants.
.
3. Leave some open space. There are some days when I want to plant every conceivable square foot of my property, but in the center of our back garden is an open lawn. I keep the lawn not because I love grass, but because it is a great place to hang our tree swing, play ball and lawn games, or to have a picnic. We also use this area as the place to pitch our tent when we do backyard camping during the summer. For a map of the open spaces and the gardens, click here.
4. Make paths that allow the children to go where they want to go. Having paths in the garden that allow your children to easily and quickly go where they want to go is important if you do not want your beds and plants to get trampled. Some of the paths are grass, others just stepping stones, some mulch (pictured in the Children's Garden), and others stone. In addition, I have stepping stones within my borders which make it easy to retrieve lost balls or Frisbees without damaging the plantings.
.

5. Allow and encourage your children to garden with you. The importance of having children grow and tend plants within the garden cannot be over emphasized. It gives them great joy and a strong sense that this is their garden. Growing vegetables is an obvious place to start. Baby tomatoes, lettuce, sugar snap peas, pole beans, carrots, and cucumbers are all easy to grow, can be picked frequently, and eaten with little to no preparation. In the garden, you can grow unusual, heirloom varieties that are not at the grocery store. For example, my children love to grow lemon cucumbers (pictured) which look like a lemon, but taste like a cucumber. In addition, we usually grow several different leaf lettuces like Amish Deer Tongue or Red Velvet.
.
I also try to accept their help whenever they offer. I know that sometimes is won't be done 'right' and it will often take twice as long. Yet, the satisfaction they get from doing the job is beyond measure. I fondly remember how my son planted a baby lilac in a one gallon pot we bought from Doc Lilac in Rochester, New York. He must have been only five, but he dug the hole and planted it without any help from me. My son with pride recalls this every year when the lilacs come into bloom.
.
6. Allow them to cut flowers. Making bouquets of cut flowers is another way my children enjoy the bounty of the garden. They love making vases for our home and to give to friends. Inspired by Chanticleer, I always keep a large bowl filled with water in which we can float flowers and foliage from the garden. Even the youngest child can pick flowers by hand and create a floating arrangement. The children also know that they can use leaves and flowers from the garden in their games also. If they are having races, they feel free to make little crowns out of boxwood for the champions. They will use leaves to make landscapes is the sandbox. Our only rule is never always take from the same plant.
.
7. Plant to engage all of your children's senses.
.

*Touch - everyone loves stroking the leaves of lambs' ear (pictured) or verbascum bombyciferum
.
*Smell - scented leaves (costmary, mint, monarda, lavender) and flowers (roses, valerian, tuberose, daffodils, some irises, peonies, sweet bay magnolia, phlox, winter honeysuckle, abelia, hosta plantangiana, and lilies) are favorites
.
*Time - plants that tell time are fascinating for children, such as morning glories, moonflowers, four o'clocks, evening primrose, and daylilies
.
*Size - large leaves (brunnera, elephant ear) and flowers (sunflowers, dinner plate dahlias) are fun for kids
.
8. Attract birds and butterflies to the garden.

*Gold Finches - purple coneflower, sunflowers

*Hummingbirds - honeysuckle, monarda, salvia, cardinal flower

*Butterflies - butterfly bush (pictured), phlox, daisies of all sorts, catmint, and lavender
.
*Swallowtail and Monarch Caterpillars - butterfly weed, dill, and rue (the children love seeing them grow and mature until they make their chrysalis and become butterflies)
.
9. Plant something in honor of each child. With the birth of a child, I always plant a rose in their honor. As they grow, they develop an attachment to it knowing that this is their rose. Pictured is my fourth child's rose in the Rose Garden.
.
10. Read some books on Children's Gardens. Some inspiring books on the subject are Molly Dannenmaier's A Child's Garden and Sharon Lovejoy's Roots, Shoots, Buckets & Boots and Sunflower Houses.

Search Heirloom Gardener

Google
 

Blog Archive

Blogflux

Blog Flux Pinger - reliable ping service. Blog Directory Alltop, all the top stories
Powered By Blogger