I like doing this with my kids, but because of our slope, we all wake up on one side of the tent. For the full post, click here.
Welcome to Heirloom Gardener
Wednesday, August 05, 2009
Gardening Tips 'N' Ideas: Camping in your garden
Posted by
Julia Erickson
at
10:05 PM
0
comments
![]()
![]()
Labels: Gardening with Children
Tuesday, July 28, 2009
More Ticks, More Misery: A mother's experience in avoiding deer ticks and Lyme disease
As a mother of five that spends a lot of time with her children outside in a region with a large deer population, deer ticks and Lyme disease are a significant concern. Several people we know have been infected with Lyme disease with negative health consequences. For some unknown reason, it seems that many doctors do not test sick children (and adults) with symptoms of Lyme disease unless they are specifically asked. As a result, people often go undiagnosed and untreated for an extended period of time, making the condition worse. On our property, we do get the yard commercially sprayed against deer ticks, even the parts that are fully fenced off from the deer. In addition, we also consciously look out for them on our children and have over the years found and removed a few, usually near the hair line. They are tiny and difficult to spot if you are not looking for them.
From the "Room for Debate" column in The New York Times:
"Is the tick problem getting worse, or does it just seem that way at this time every year? Fighting back involves a lot of individual strategies: tucking pant legs in socks, using bug spray (while hating it), obsessively doing full-body checks at the end of a summer day and building deer fences. Yet the public as a whole has been ineffective in dealing with the plague of black-legged (deer) ticks, which spread Lyme disease, a problem linked to, among other things, the overpopulation of deer, which the ticks feed on. What is important to know about ticks and their environment, and what steps might be taken to control them?"
For the full story, click here.
Posted by
Julia Erickson
at
9:42 PM
2
comments
![]()
![]()
Labels: Gardening with Children, New Jersey / Local Interest
Wednesday, April 29, 2009
Gardening with Children: Pictures of an Eight Year Old's Spring Garden
As I wrote in my Ten Tips for Planning a Children's Garden, one of the ways to enable your children to enjoy and appreciate the garden is to encourage them to participate in the gardening activity. Each of my children has a small plot that I let them plant. Last year, my now eight year old planted primarily annuals, but in the fall decided to follow mom's example and densely plant daffodils and tulips. What do yo think? I think she might have out-planted mom!
.
.
Posted by
Julia Erickson
at
6:00 PM
5
comments
![]()
![]()
Labels: Bulbs and Tubers, Gardening with Children, Spring Garden
Sunday, December 28, 2008
Garden Bloggers' Design Workshop on Kids in the Garden: What the Kids Say
This month's Garden Bloggers' Design Workshop at Gardening Gone Wild is on Kids in the Garden. As a gardener with five young children, my whole blog is in part about gardening with children. Some of the most popular posts on my blog have been the most explicit about the topic, including:
~
 "My favorite thing in the garden is making flower arrangements. I like putting different flowers together. My favorite color is pink, so a lot of my vases have pink in them. One of my favorite plants is the hibiscus, but the flowers only stay good in a vase for one day. Phlox are good too."
 "My favorite thing in the garden is harvesting vegetables. There are so many different ones to find in the vegetable garden. My favorites to harvest are the tomatoes."
 "My favorite thing about gardening is looking at the flowers. Some of my favorite flowers are daffodils, tulips, and muscari. Muscari is my favorite because it looks like it has bells."
Posted by
Julia Erickson
at
8:00 PM
5
comments
![]()
![]()
Labels: Garden Bloggers' Design Workshop, Gardening with Children
Monday, November 24, 2008
Five Tips for Growing Edibles with Children

This month's Garden Bloggers' Design Workshop at Gardening Gone Wild is on Edibles in the Garden. While I am primarily a flower gardener, I do grow edibles in a dedicated vegetable plot, as well as in my mixed borders and containers. Given the size of my suburban lot, I cannot expect to grow enough to feed my family, but what I do grow is a lot of fun. Here are five tips for gardeners who want to attract those beneficials otherwise known as children.
~
~
 2. Grow vegetables that your children can plant, tend and/or harvest. This takes a little more effort on the part of mom than the former suggestion, but children can learn a lot from planting, tending and harvesting vegetables too. It's really amazing for a child to plant a seed or seedling, water it, watch it grow, tend it, and harvest it. This year, my children helped plant almost all of the vegetables and took particular pleasure in harvesting the asparagus, lettuce, eggplant, zucchini, tomatoes, cucumbers, corn and potatoes.
 3. Grow heirloom varieties that you can't buy in the grocery store. As you can tell by the name of my blog, Heirloom Gardener, I am particularly interested in plants that our grandparents and prior generations grew. While these varieties aren't typically available as seedlings at your local nursery, you can buy an almost infinite variety through online and offline catalogs and seed exchanges. The children find the variety and novelty of them quite interesting. Some of my children's favorites this season were the lemon cucumbers (they are about the size and color of a prickly lemon) and the German stripe tomatoes (mostly yellow with a spot of orange on one end).
~
 4. Grow edibles with which they can play. In addition to using some of the above vegetables for playing store, the children have also found other ways to play with the edibles. For example, they love using the hollow stems of chives and lovage as drinking straws. Also, they have made up a drink with the fresh mint, which is made of crushed mint leaves, sugar, and sparkling water.
~
 5. Grow flowers that are also edible. The children find it quite amusing that some flowers are edible. They particularly like including pansies, marigolds, calendula, and nasturtium flowers and leaves in our salads with mixed greens or as garnish.
~
Related posts:
- How to Build Raised Beds (on a Slope/Hill)
- Organically Preparing the Soil for Planting
- How to Make the Perfect Soil Mix for Seed Sowing
- Farmer's Almanac Spring Planting Schedule (May)
- Farmer's Almanac Spring Planting Schedule (April) and Heirloom Seed Sources
- How to Plant Corn the Way Squanto Taught the Pilgrims
- How to Plant Potatoes and Harvesting Asparagus
- My Eight Year Old Son's Great Potato Harvest
- Organic Beetle Control with Children
- Ten Tips for Planning a Children's Garden
- Creating the Children's Garden
Posted by
Julia Erickson
at
9:00 AM
5
comments
![]()
![]()
Labels: Garden Bloggers' Design Workshop, Gardening with Children, Heirloom and Organic Food
Saturday, September 27, 2008
My Eight Year Old's Great Potato Harvest
 Way back in May, I wrote about my eight year old son's preparing and planting the seed potatoes in our raised vegetable beds. After months of watering, tending, and fighting off the potato beetles, he eagerly dug up the potatoes all by himself (this post is a few weeks late). From just a few plants, we got an entire bowl of these tender fingerling potatoes. After we cleaned, boiled, buttered, and salted them, they were the delight of our meal. My son was quite proud of himself.
Posted by
Julia Erickson
at
8:15 AM
6
comments
![]()
![]()
Tuesday, August 05, 2008
"Children have lost touch with the natural world and are unable to identify common animals and plants," according to a UK survey
As a follow-up to my prior post on Richard Louv's book, Last Child in the Woods - Saving Our Children from Nature Deficit Disorder, the UK newspaker, The Independent, ran an article about a UK survey on the subject. Sadly, the journalist Sarah Cassidy reports:
"Half of youngsters aged nine to 11 were unable to identify a daddy-long-legs, oak tree...or bluebell, in the poll by BBC Wildlife Magazine. The study also found that playing in the countryside was children's least popular way of spending their spare time, and that they would rather see friends or play on their computer than go for a walk or play outdoors."
"Experts blamed the widening gulf between children and nature on over-protective parents and the hostility to children among some conservationists, who fear that they will damage the environment. They said that this lack of exposure to outdoor play in natural environments was vital for children's social and emotional development."
"Dr Martin Maudsley, play development officer for Playwork Partnerships, at the University of Gloucestershire, said that adults had become too protective of wild places: 'Environmental sensitivities should not be prioritised over children.'"
"He said: 'Play is the primary mechanism through which children engage and connect with the world, and natural environments are particularly attractive, inspiring and satisfying for kids. Something magical occurs when children and wild spaces mix.'"
Posted by
Julia Erickson
at
7:06 AM
6
comments
![]()
![]()
Labels: Deep Thoughts About Gardening, Gardening with Children
Friday, July 25, 2008
Garden Bloggers' Design Workshop on Garden Whimsy: Guard Frogs and Garden Names
I missed last month's Garden Bloggers' Design Workshop on Porches and Decks because I was just too busy gardening! This month's Garden Bloggers' Design Workshop at Gardening Gone Wild is Garden Whimsy. The truth is I don't think I have too many whimsical elements in my garden, but then two ideas came to mind: the entrance to the Children's Garden and the names of my garden rooms.

Garden Names. In a prior post, I included a map of my garden. For planning purposes, I name each of the garden rooms, which is not whimsical in and of itself. The whimsy, which is more of an inside joke than an external display, is that the garden rooms have names that are aspirational to a much larger or grander property, such as the Long Border that is not too long, the Great Lawn that is modest in size, and the Walled Garden that lacks a proper wall but is rather made up of stones that I dug up from the beds. While I do take my gardening seriously, it's good not to take it too seriously.
Posted by
Julia Erickson
at
9:37 PM
6
comments
![]()
![]()
Labels: Garden Bloggers' Design Workshop, Gardening with Children
Thursday, July 10, 2008
A Book Worth Talking About: Last Child in the Woods - Saving Our Children from Nature Deficit Disorder by Richard Louv
First published in 2005 and re-published in 2008, I first heard about Last Child in the Woods by Richard Louv from another book, A Child's Garden by Molly Dannenmaier, which I read and enthusiastically reviewed last year. I'm reading it right now and would highly recommend it to anyone with children. From the introduction:
"Within the space of a few decades, the way children understand and experience nature has changed radically...Today, kids are aware of the global threats to the environment--but their physical contact, their intimacy with nature, is fading...
...This book explores the increasing divide between the young and the natural world, and the environmental, social, psychological, and spiritual implications of that change. It also describes the accumulating research that reveals the necessity of contact with nature for healthy child--and adult--development...
...Our society is teaching young people to avoid direct experience in nature. That lesson is delivered in schools, families, even organizations devoted to the outdoors, and codified into the legal and regulatory structures of many of our communities..."
An absurd example of this was written about in today's New York Times in the article "Build a Wiffle Ball Field and Lawyers Will Come," which reports on the local Greenwich, Connecticut backlash against a group of teenagers who turned an empty, town-owned lot into a miniature Fenway Park. The saddest quote comes from Jeff Currivan, 17: “They think we’re a cult...People think we should be home playing ‘Grand Theft Auto.’ ”
Posted by
Julia Erickson
at
10:52 PM
4
comments
![]()
![]()
Labels: Books and Movies, Deep Thoughts About Gardening, Gardening with Children
Wednesday, June 04, 2008
Organic Pest Control: Threelined Potato Beetles, Colorado Potato Beetles, and Japanese Beetles
I could never imagine spraying inorganic chemical pesticides on vegetables or herbs that I am growing in my own raised vegetable beds. This year, two beetles have started to attack my potato plants. The more numerous of my beetles are the smaller (pictured) Threelined Potato Beetles (Lema trilineata).
 They lay small yellowish eggs (pictured) on the underside of the potato leaves.
 The other, larger beetle is the Colorado Potato Beetle (Leptinotarsa decemlineata).
 These beetles lay somewhat larger, orange eggs (pictured), also on the underside of the potato leaves.
 Organically controlling the beetle population is something that I have taught my children how to do, includes them in the vegetable tending process, and is an activity that they enjoy. Here's how to do it:
1. Fill a jar with soapy water.
2. Hold the jar under any beetles that you see.
3. If you bring your hand close to a beetle, it will have a natural flight response of dropping to the ground--or in this case, into your jar.
4. Once they fall into the soapy water, they lose the ability to fly and quickly sink to the bottom; in 5-10 minutes, you can rid yourself of dozens of these pests.
5. As for the eggs, check the undersides of your leaves; I find them sticky and difficult to remove, so I just tear off the leaves and stick them in the water too.
Side note: This method also works on the Japanese Beetles (Popillia japonica) that attack my roses in July.
Posted by
Julia Erickson
at
7:43 PM
30
comments
![]()
![]()
Labels: Gardening with Children, Heirloom and Organic Food, Pest Control, Pruning and Maintenance, Roses
Saturday, May 24, 2008
Vegetable Gardening with Children: How to Plant Corn with Fish the Way Squanto Taught the Pilgrims

~
There is a well-known and amazing story about how Squanto--the Native American captured and sold into and escaped from European slavery--befriended and taught the bewildered and hungry English pilgrims how to plant corn using fish as fertilizer, which was later harvested and eaten at the first Thanksgiving.
~
Inspired by this story, we used whole fish as fertilizer last year, which worked quite well, and repeated it again this year as follows:
~
1. Catch (or buy) some fresh whole fish.
2. Dig a hole several inches deep and add your fish.
3. Plant your kernels (or seedlings) on top of the fish.
~
Related posts: Ten Tips for Planning a Children's Garden, How to Build Raised Vegetable Beds, Organically Preparing the Soil for Planting
Posted by
Julia Erickson
at
8:53 AM
5
comments
![]()
![]()
Tuesday, May 13, 2008
Gardening with Children: How to Make a Crown and Boutonniere with Fresh Flowers
 Last Saturday, two of my children made their First Communion. As a part of the joyous celebration, I made a crown for my daughter and a boutonniere for my son using fresh flowers from my garden. They were easy to make and could also be used for weddings (the perfect touch for a flower girl or ring bearer) and other special events of the summer.
 1. The base of the crown. As a base, I made ring out of a long, flexible branch from a weigelia. I bound the ends together with floral wire and tape. You could also use a young branch from forsythia, spirea, or honeysuckle.
 2. The flowers for the crown. Then, I went out to collect fresh flowers from my garden. I looked for flowers that were not too big and would last well out of water. Also, I took many fragrant flowers. I collected the following: daffodils, honeysuckle, brunnera, muscari, bluebells, dogwood, daphne, forget me nots, and cherry blossoms.
 3. Attaching the flowers to the base. With floral wire, I attached each flower to the weigelia base.
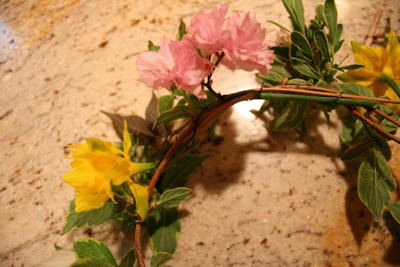 4. The finished product. When it was done, I spritzed the crown with water and put it into the refrigerator until we were ready to put it on.
 For the boutonniere, I used a brunnera leaf as the backing and wrapped daffodils and brunnera flowers together. I secured the whole thing together with floral tape and put it into the refrigerator to wait. The boutonniere was lovely, but I would not use brunnear foliae again because it wilts very quickly out of water (see picture); an immature hosta leaf would have been better.
Posted by
Julia Erickson
at
10:52 PM
5
comments
![]()
![]()
Friday, May 02, 2008
Vegetable Gardening with Children: How to Plant Potatoes and First Harvest of the Season - Asparagus
 While my less-than-half-an-acre suburban lot is primarily a flower garden, I do enjoy growing the vegetables and herbs for which I have room. A few years ago, I visited the working organic farm at Old Sturbridge Village in Massachusetts and learned that it would take approximately one acre to feed my entire family of seven for the year.
  Thus, rather than trying to feed my family, the vegetables and herbs primarily provide an opportunity for my children's participation and education. We get to organically prepare the soil, plant the seeds or seedlings, and then harvest the results.
  Further, we get to plant heirloom varieties that are otherwise not available. In terms of yield, we produce enough for the occasional amuse-bouche or side dish. To satisfy our need for organic and locally harvested produce, we shop at the local farmers' markets in Chatham and Summit from June through November.
~ Last week, according to the Old Farmer's Almanac, it was time to plant our seed potatoes. This is a perfect activity to do with children, or if old enough to handle a sharp knife, something that the children can do by themselves with some adult supervision. First, our son (age eight) prepared our seed potatoes (purchased from Seed Savers Exchange) by cutting them into one inch pieces.
  Second, we cured them cut-side up for three days to prevent them from rotting in the soil. Third, we planted them an inch-or-so in the raised vegetable bed with the eyes up.
~
Three years ago, we planted our first asparagus crowns (purchased from the Cook's Garden) around the outside of the Children's Garden. This weekend, we got our first harvest--three big, beautiful stalks of asparagus (pictured).  The kids were so excited to cut the asparagus (about one inch above the ground), roast it, and then eat it with dinner. In the coming weeks, we'll have more to harvest.
~
Related posts: Ten Tips for Planning a Children's Garden, How to Build Raised Vegetable Beds, Old Farmer's Almanac Spring Planting Schedule
Posted by
Julia Erickson
at
10:05 PM
8
comments
![]()
![]()
Labels: Gardening with Children, Heirloom and Organic Food, Spring Garden
Sunday, April 13, 2008
Gardening with Children: Ten Tips for Planning a Children's Garden
Creating a welcoming place for my children and their friends to play and enjoy nature while I pursue my favorite activity is one of the main goals as I develop my garden. After all, the more time they want to spend in the garden playing, the more time I get to garden. If you are planning a children's garden of your own, here are ten things to keep in mind.
. 1. Create areas that attract and encourage children to play. In the Walled Garden, my husband built an eight-by-eight foot sandbox. The kids love this, especially because its generous size allows them to build elaborate neighborhoods and landscapes in the sand. Also, around the sandbox is a sitting area for me to relax with them when I want. Adjacent to the sandbox is a digging area (pictured) that my children specifically requested. Children love to dig and get dirty and I do not want to find holes in my lawn or beds, so designating an area for this activity makes everyone happy.
. Next to the digging area in the Walled Garden is the fort. Play houses are great outdoor spaces for kids to play and hide. They give children a place of their own within the garden and are the center of many make believe games. Other ideas for play houses that I have seen are weeping trees that can be used as hide outs, sunflower houses, and outdoor teepees. Children want safe places to hide that are secret, but are not scary by being too out of the way or too dark. It reminds me of the toddler that walks away from you, but continues to look back every few steps to make sure you're still there. Along a section of our fence I planted four Lyland cypresses (pictured) to screen out our back neighbor who just removed a bunch of trees in the back of their property. These cypresses have turned out to be great hiding places, often serving as the 'secret passage from one land to another' or the 'other room.'
. 2. Accommodate the spaces where children naturally gravitate. One of my children's unexpectedly favorite places to play hide and seek, cops and robbers, and other made-up games is the miniature woodland (pictured) of Goldberry Hill. Here I have planted various shrubs, trees, and evergreens. Along one side of this woodland are tallish evergreens and twiggy shrubs that provide cover and privacy from the street. The other three sides open into the garden. Being in suburbia, my children to do not have the joy of really playing in the woods, but this provides them with a small taste.
. The area reminds me of the old fashioned shrubberies: it includes a climbing tree; shrubs which they can hide under like a mature weigela; airy, open evergreens that they can see through; and large, majestic white pines to sit under. The area is mainly planted with ground cover and daffodils. I keep the ground fairly clear of perennials so the children can fill free to run about among the trees and shrubs without any concern of stepping on small plants.
. 3. Leave some open space. There are some days when I want to plant every conceivable square foot of my property, but in the center of our back garden is an open lawn. I keep the lawn not because I love grass, but because it is a great place to hang our tree swing, play ball and lawn games, or to have a picnic. We also use this area as the place to pitch our tent when we do backyard camping during the summer. For a map of the open spaces and the gardens, click here.
 4. Make paths that allow the children to go where they want to go. Having paths in the garden that allow your children to easily and quickly go where they want to go is important if you do not want your beds and plants to get trampled. Some of the paths are grass, others just stepping stones, some mulch (pictured in the Children's Garden), and others stone. In addition, I have stepping stones within my borders which make it easy to retrieve lost balls or Frisbees without damaging the plantings.
. 5. Allow and encourage your children to garden with you. The importance of having children grow and tend plants within the garden cannot be over emphasized. It gives them great joy and a strong sense that this is their garden. Growing vegetables is an obvious place to start. Baby tomatoes, lettuce, sugar snap peas, pole beans, carrots, and cucumbers are all easy to grow, can be picked frequently, and eaten with little to no preparation. In the garden, you can grow unusual, heirloom varieties that are not at the grocery store. For example, my children love to grow lemon cucumbers (pictured) which look like a lemon, but taste like a cucumber. In addition, we usually grow several different leaf lettuces like Amish Deer Tongue or Red Velvet.
.
I also try to accept their help whenever they offer. I know that sometimes is won't be done 'right' and it will often take twice as long. Yet, the satisfaction they get from doing the job is beyond measure. I fondly remember how my son planted a baby lilac in a one gallon pot we bought from Doc Lilac in Rochester, New York. He must have been only five, but he dug the hole and planted it without any help from me. My son with pride recalls this every year when the lilacs come into bloom.
.
6. Allow them to cut flowers. Making bouquets of cut flowers is another way my children enjoy the bounty of the garden. They love making vases for our home and to give to friends. Inspired by Chanticleer, I always keep a large bowl filled with water in which we can float flowers and foliage from the garden. Even the youngest child can pick flowers by hand and create a floating arrangement. The children also know that they can use leaves and flowers from the garden in their games also. If they are having races, they feel free to make little crowns out of boxwood for the champions. They will use leaves to make landscapes is the sandbox. Our only rule is never always take from the same plant.
. 7. Plant to engage all of your children's senses.
.
.
.
.
 8. Attract birds and butterflies to the garden.
*Gold Finches - purple coneflower, sunflowers
*Hummingbirds - honeysuckle, monarda, salvia, cardinal flower
*Butterflies - butterfly bush (pictured), phlox, daisies of all sorts, catmint, and lavender
*Swallowtail and Monarch Caterpillars - butterfly weed, dill, and rue (the children love seeing them grow and mature until they make their chrysalis and become butterflies)
 9. Plant something in honor of each child. With the birth of a child, I always plant a rose in their honor. As they grow, they develop an attachment to it knowing that this is their rose. Pictured is my fourth child's rose in the Rose Garden.
.
10. Read some books on Children's Gardens. Some inspiring books on the subject are Molly Dannenmaier's A Child's Garden and Sharon Lovejoy's Roots, Shoots, Buckets & Boots and Sunflower Houses.
Posted by
Julia Erickson
at
10:07 PM
10
comments
![]()
![]()
Labels: Gardening with Children
Friday, March 21, 2008
Gardening with Children: Replacing the Playground Mulch with Cedar Mulch
 Last year, we put down a fresh layer of playground mulch in our children's play area (pictured). However, the playground mulch was made of pine and this was not a good thing.
Because the play area is at the bottom of the hill, rain washed down to the play area and the playground mulch became moist. By the end of the season, the playground had become a mushroom patch and the children refused to play there.
So last week, we skipped the pine playground mulch and put down thirty large bags of high quality cedar mulch. For the kids' sake, we hope the cedar mulch keeps away the mushrooms.
Posted by
Julia Erickson
at
9:45 PM
4
comments
![]()
![]()
Sunday, March 16, 2008
Gardening with Children: How to Build a Sandbox
 A tried and true way to make your garden inviting for children is to place a sandbox in it. After the 100+ year old oak tree crushed our last sandbox, my husband built a bigger and better one. Here's how he did it:
1. Select a location. You need a flat or a relatively flat location. We have relatively few flat locations on our property, so we placed the sandbox in the Walled Garden. With the oak and tulip trees gone, our sandbox is now in full sun, though we preferred the part sun/part shade. We are growing some new trees around the sandbox which should provide shade in 25+ years.
2. Determine the size. When it comes to sandboxes, our kids seem to think that bigger is better. Our sandbox is eight feet by eight feet, which is big enough for all of our kids and their friends to dig and build to their hearts' content.
3. Gather together your materials and tools. Here's what we used:
- 6 two by eight foot boards (we've seen instructions using two by fours or two by sixes, but these are too shallow) cut to your desired length
- one box of deck screws
- one roll of landscaping fabric
- 40+ fifty pound bags of play sand
- cordless drill
- staple gun
 4. Construct the sandbox. Using your cordless power drill and deck screws, construct the walls of your sandbox. The walls should be parallel so that the ends are eight feet long and the sides are eight feet four inches. Attach the seats on the top at each end.
5. Line the sandbox. In order to prevent anything growing up from the ground into your sandbox as well as to allow water to drain out out of it, lay landscaping fabric on the bottom of your sandbox and using your staple gun, staple it into the inside walls.
 6. Fill the sandbox. Okay, here's where the heavy lifting comes in. You need play sand--a lot of play sand. Initially, we put in 40+ fifty pound bags of play sand. If you have active kids, be prepared to replenish the sand once or twice a year.
*****
Note: if you have active cats on your property, you may want to think about adding a sandbox cover.
Related posts: How to Build a Playhouse (Fort), Ten Tips for Planning a Children's Garden
Posted by
Julia Erickson
at
7:25 PM
3
comments
![]()
![]()
Labels: Gardening Tools and Structures, Gardening with Children
Saturday, March 01, 2008
Gardening with Children: How to Make a Succulents Terrarium
I recently mentioned to my children that I created a terrarium when I was a little girl. Since then, they have been asking me to help them make one of their own. Yesterday, I was ordering some plants for the upcoming season at Annie's Annuals (http://www.anniesannuals.com/), one of my favorite nurseries, and they had a video on Succulents Terrariums as featured on Martha Stewart (http://www.marthastewart.com/article/succulents-terrariums?lnc=38f9cf380e1dd010VgnVCM1000005b09a00aRCRD&rsc=showmain_tv_the-martha-stewart-show). With this inspiration, we went to our local nursery, the Farm at Green Village (http://www.thefarmatgreenvillage.com/), bought our supplies and made our terrarium.
If you don't have time to watch the video, here is a simplified step-by-step guide:


Posted by
Julia Erickson
at
5:59 PM
2
comments
![]()
![]()
Labels: Gardening with Children, Nurseries
Search Heirloom Gardener
Labels
- About Blogging
- Annuals/Biennials and Perennials
- Autumn Garden
- Books and Movies
- Botanical Gardens
- Bulbs and Tubers
- Children's Garden
- Chrysanthemum
- Clematis
- Container Gardening
- Crocus tommasiniasus roseus
- Cut and Forced Flowers
- Cutting and Rose Gardens
- Dahlias
- Deep Thoughts About Gardening
- Egg Garden
- Fences Arbors Walls and Paths
- Floral arrangements
- Front Border
- Fun Stories About Gardening
- Garden Bloggers' Bloom Day
- Garden Bloggers' Design Workshop
- Garden Planning
- Gardening Blogs
- Gardening Tools and Structures
- Gardening with Children
- Goldberry Hill
- Heirloom and Organic Food
- Hibiscus
- Holidays
- Hydrangeas
- Japanese Beautyberry
- Lilies
- Mixed Borders
- New Jersey / Local Interest
- Nurseries
- Online Gardening Resources
- Peonies
- Pest Control
- Picture This Photo Contest
- Piet Oudolf
- Poppies
- Propagation and Seeds
- Pruning and Maintenance
- Roses
- Seed Heads
- Self Seeders
- Shrubs
- Spring Garden
- Summer Garden
- Trees
- Wildlife in the Garden
- Winter Garden
- Zinia


