Showing posts with label Cutting and Rose Gardens. Show all posts

Monday, June 01, 2009

The Rose Garden in Summer, Part I: A Walk Down the Brick Path of a 15' x 30' Rose Garden in a Sloped Suburban Backyard

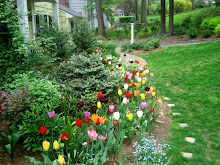
Can a home gardener have a rose garden? If you have ever asked yourself that question, my answer is an unequivocal yes. Inspired by the Cranford Rose Garden at the Brooklyn Botanical Garden, I knew that I could fit a lot of roses into a small space, which I have endeavored to do in this 15' x 30' strip of a sloped suburban backyard. In this post (Part I), I'll take you on a short little walk up and down the brick path. In the next couple of days, I'll endeavor to sort through the close-ups of the individual roses and try to post at least some of them.
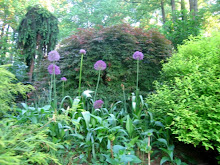
.
A view from the Cutting Garden looking down towards the Children's Garden

A view of the upper right side from the Cutting Garden as you walk down towards the Children's Garden
A view of the upper left side as you walk up from the Children's Garden towards the Cutting Garden

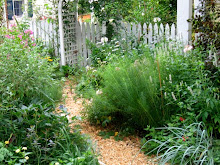
A view of the lower left side from outside the Rose Garden
A view of the tuters in the middle of the right side from outside the Rose Garden

A view of the lower right side as you walk down towards the Children's Garden
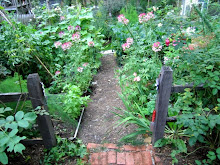
A view of the lower left side as you walk down towards the Children's Garden
A view of the lower left side as you walk up to the Cutting Garden
A view of the lower right side as you walk up to the Cutting Garden
A view from the Children's Garden looking up towards the Cutting Garden

A view of the lower left side from the Children's Garden looking up towards the Cutting Garden
.

Sunday, May 31, 2009

Some of the Roses Growing in the Cutting Garden: Louis Odier, Dortmund, Complicata, Jacques Cartier, Felicite Parmentier, Crimson Glory

Louis Odier on the side fence

Dortmund on the arbor
Complicata on the lattice in front of the chimney
Jacques Cartier on the back fence
Felicite Parmentier (white) on the back fence and Crimson Glory (red) on a tutuer
I apologize that some of these pictures are not in better focus, as they were taken by hand at slow shutter speeds at dusk.
.
UPDATE: As per several requests, I have added the names of the roses next to the pictures.
.

Sunday, May 03, 2009

The Cutting Garden: The Joy of Spring Tulips

One of my early posts on Heirloom Gardener was "Creating Space for a Garden: the Cutting Garden" in which I wrote about transforming the small 15x30 foot side yard from an unused space into a delightful little Cutting Garden.
These past few weeks have been a joy in the Cutting Garden, as the tulips (pictured) have begun to bloom.
Fresh cut tulips bring such great joy throughout my home, as well as to the homes of my friends, and the variety that you are able to grow at home is so much more amazing than what you can purchase.
And, as I mentioned in my Ten Tips for Planning a Children's Garden, I plant enough in the Cutting Garden that my children can cut as many tulips as they wish without me worrying that they've cut too many.
Lastly, growing them in the fenced-in Cutting Garden protects them from the deer (though not the squirrels and chipmunks), that I wrote about in What I've Learned About Growing Tulips in New Jersey.

Monday, March 17, 2008

Maintaining a Pebble Path and Keeping the Groundhog Out of the Cutting Garden

It was a wonderful day in the garden. The weather was warmish in the sun and there was very little wind. My husband and I worked today on the path in the Egg Garden that leads to the Cutting Garden. First, we added more pebbles--ten fifty pound bags or river stones--which is an annual necessity to maintain a good looking pebble path. Then, we replaced the temporary groundhog deterrent I had put down last year at the gate.

In the Cutting Garden, I grow some of the groundhog's favorite foods: Queen Anne's lace, purple cone flower, and phlox. Knowing this, when I created the Cutting Garden, I dug around the border of the fence about two feet deep to install a chicken wire barrier which the groundhog couldn't get through. You can see some of this chicken wire sticking up out of the earth in the picture above.

However, one spot was left without the barrier: the area where the gate goes into the garden. It took a few years, but the groundhog, who lives next door, discovered last year that he could dig under the gate. Looking for some immediate protection, I simply pegged a piece of chicken wire on the ground under the gate extending one foot on each side. I suppose he found enough food elsewhere that he didn't take the effort to dig underneath this barrier, but it had two problems: it was not attractive and it easily caught on the gate or your foot as you passed through.

Our project today was to replace the temporary chicken wire with three rows of six by six inch terracotta blocks that we were using for stepping stones in other places in the garden. While digging the space for the new barrier, I discovered more terracotta blocks and chicken wire that I must have buried in an earlier attempt. We placed the new blocks level with the fence (almost touching) over all the existing material for extra protection.

I don't know why it took me so long to do this. Everything looks a lot neater now and I will no longer have to worry about tripping as I leave and enter the garden.
~
For a picture of the groundhog barrier around my vegetables, click here:
http://heirloomgardener.blogspot.com/2007/12/raised-vegetable-beds.html
~
For a prior post on the path to the Cutting Garden, click here:
http://heirloomgardener.blogspot.com/2008/01/egg-garden-path-makeover-replacing.html
~
For a prior post on keeping deer out of the backyard, click here:
http://heirloomgardener.blogspot.com/2007/12/keeping-deer-out-of-backyard-deer-fence.html

Friday, January 18, 2008

The Rose Garden in Spring & Summer; Daffodils Replace Lavender Border

To help me plan for this coming gardening season, I am going through some of my pictures from last year. Here are two pictures of the Rose Garden from last spring and summer.

The first picture is from early spring before the roses bloom. Previously, the path was lined with lavender, but the lavender didn't work. The purpose of lining the path was to provide interest before the roses started to bloom. The lavender looked great when I first put it in during the summer, but the next season I learned that it is one of the last perennials to wake up from winter--later than the roses themselves. Thus, I pulled out all of the lavender and replaced it with daffodil bulbs. As you can imagine, the daffodils looks much better in spring than the lifeless lavender. The second picture is from late spring when the roses have started to bloom.

The Rose Garden was created from a strip of previously unused lawn. The central brick pathway starts at the back of the Cutting Garden runs through the Rose Garden and ends at the Children's garden. For more information on the creation of the Rose Garden, click here: http://heirloomgardener.blogspot.com/2007/12/creating-rose-garden.html


Friday, December 07, 2007

Creating the Rose Garden with a Central Brick Path

After we established the Cutting Garden, there was a narrow portion of our property behind it and next to our deck that was another relatively unused portion of our yard, measuring approximately fifteen feet wide by thirty feet long.

Because this space had full-sun, I thought it was the perfect place for a rose garden. While I have roses in almost every part of the garden, a dedicated rose garden would provide more space for all of the roses that I wanted to grow.

The first picture is taken from the steps of the Cutting Garden looking down the path of the Rose Garden to the Children's Garden.

The main structural element of the Rose Garden is the brick path that you see running through the center. I actually installed the brick path myself, which was a tremendous amount of work that I'm not sure I would want to do again.

After we established the path in the summer, we started to prepare the beds for planting the roses. In the fall, we put down newspaper to kill the grass and covered it with a thin layer of organic matter. In the spring, we dug in significant amounts of composted cow manure and mushroom compost. Then, we planted the roses.

Inspired by the Cranford Rose Garden at the Brooklyn Botanical Garden, I knew that I could fit a lot of roses into a limited space. We now have twenty-seven different roses in the Rose Garden, as well as bulbs and perennials.

Some of the roses are grown on tutuers. The three pictured were purchased from the New York Botanical Garden, which has the best gift shop of all of the gardens I visit:

http://www.nybgshop.org/

For pictures of the Rose Garden in season, click here:

http://heirloomgardener.blogspot.com/2008/01/rose-garden-in-spring-summer-daffodils.html

For information on the creation of the Cutting Garden, see this post:

http://heirloomgardener.blogspot.com/2007/11/creating-space-for-garden.html

Wednesday, November 28, 2007

Creating Space for a Garden: the Cutting Garden

Like many suburban gardeners, one of the hardest things to do is find space for all of the plants that you want to cultivate. One solution is to create gardens in the under-utilized parts of your property.

Like many suburban tracts, each home in my neighborhood has about thirty feet of space between each house. When we moved in, the fifteen feet on our side of the property line included a very large rhododendron, some unattractive evergreen trees, some grass, and a lot of weeds. The only thing we did on this strip of property was occasionally walk from the front yard to the back yard.

After a couple of years, we decided to remove the existing trees and plants and transform the space into a cutting garden. This space measures approximately fifteen feet wide and thirty feet long. We created a garden room by installing a wooden picket fence with an attractive arbor and gate in the front (visible in the first picture from inside the garden) and a simple gate in the back. Because the side yard was also on a slope, we installed a short, one-foot dry laid wall in the back to decrease the grade.

There are three foot beds on either side and a central four foot bed (visible in the second picture). The paths are too narrow at only two feet, but with only fifteen feet to work with, we had to make compromises. The soil was dead, so we dug down about two feet and also created shallow raised beds with ipe wood. Ipe is expensive, but it is far better for your garden than the toxic chemicals in pressure treated wood. Warning: ipe is very hard, which makes it rot and insect resistant, but it also makes it extremely difficult to cut with standard woodworking tools. I had to have my planks cut at the lumber yard.

After digging out the beds and creating the walls of the raised beds, we then added significant amounts of composted cow manure and Bumper Crop. These are now some of the richest beds on our property.

This is now one of the favorite parts of our property. In addition to changing this from unused and unattractive to a place we visit every day, it also produces abundant cut flowers for indoor enjoyment from May through October.

Related Post: Making the Most of Your Space for Gardening - A Map of My Gardens

Search Heirloom Gardener

Google
 

Blogflux

Blog Flux Pinger - reliable ping service. Blog Directory Alltop, all the top stories
Powered By Blogger