Showing posts with label Holidays. Show all posts
Showing posts with label Holidays. Show all posts
Thursday, January 01, 2009
Friday, December 26, 2008
Merry Christmas!
 “Glory to God in the highest, and on earth peace, good will toward men.” (Luke 2:14)
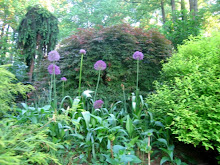
Picture: Ballerina Rose Hips
Monday, December 15, 2008
Container Gardening: More of This Year's Containers
As a follow-up to last Wednesday's post, here are the rest of this year's winter containers.


Wednesday, December 10, 2008
Container Gardening: Some of This Year's Winter Containers
As per my recent posts on spray-painted alliums and wreath-making, I am trying do most of my indoor and outdoor Christmas decorating with cuttings from my garden. As a part of this effort, here are some of the winter containers that I have put together this past week. I'm about half-way done and will post pictures of the others after I finish them. If you want to see how they differ from last year's winter containers, click here.
~ Winterberry and Leyland Cypress
 Carex, blue spruce, variegated holly, Ballerina rose hips, and spray-painted allium
 Spray-painted alliums, Southern Magnolia leaves, blue spruce and Ballerina rose hips
 Ilex, Dortmund rose hips and blue spruce
 Monday, December 08, 2008
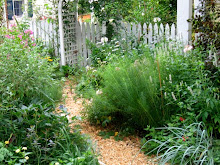
How to Make a Wreath with Materials from Your Garden

This Christmas season, I'm trying to decorate the house with as many things from the garden as possible. When you make your own decorations, you benefit from (i) fresher materials than what you can buy, (ii) the joy of bringing your garden indoors, and (iii) saving a lot of money.
~
Today, I worked on the wreath for the front door. It was an easy project that took a few hours. It is extremely fulfilling to see the wreath form before your eyes.
~
1. Gather together your supplies. You will need: (a) a wire base--I used a wire frame I purchased from Michael's, but you can also purchase them online at the Maine Wreath Co.; (b) floral wire; (c) pruners; and (d) wire cutters.
~
1. Gather together your supplies. You will need: (a) a wire base--I used a wire frame I purchased from Michael's, but you can also purchase them online at the Maine Wreath Co.; (b) floral wire; (c) pruners; and (d) wire cutters.
~
2. Cut a variety of evergreen materials from your garden. You can cut branches or just tips. Ultimately, you will use pieces that are six to eight inches long, so keep this in mind when cutting. I think of this as doing my spring pruning a few months early. After several years of doing so I see no adverse effects on the plants. If anything, they grow more robustly the following season.
~This year, I used white pine, leyland cypress, ilex and rose hips from my garden and incense cedar, which I purchased. You could also use boxwood, southern magnolia, fir, juniper, holly, spruce, yew, arborvitea, winterberry, nandina, euonyonomous, and many others--the possibilities are only limited by availability.
~3. Make your posies. Once you have gathered your supplies and have chosen which greens look good together, use them to make posies. In your hand, gather together a small arrangement of greens and berries. Wire the greens together by wrapping the floral wire around them, fanning out the arrangement as you wrap. Continue making the posies and positioning them around the wreath base. When all the posies cover your base, proceed to the next step.
~4. Attach your posies to the wire base. Attach the first posy by wrapping the floral wire around both it and the wreath frame several times. Once the first posy is in place, continue to add in the others each time making sure each additional one covers up the base of the last one.
~
5. Add the finishing touches. After the wreath base is covered you can add additional embellishments of pine cones or dried flowers with hot glue. Using the floral wire, make a hanging loop and attach this to the wreath base. You are now ready to hang your wreath.
~
6. Extend the life of your wreath (optional). If you would like to extend the life of your wreath, you can spray it with an antidessicant or mist it with water once a day.
~
Related posts:
Monday, December 01, 2008
Christmas Decorations from the Garden: Spray-Painted Alliums

 Inspired by The Garden in Winter by Suzy Bales, I am making more of my Christmas decorations with materials from the garden.
~
Earlier this year, I saved and dried my alliums for this project. This weekend, I sent my husband to the hardware store for some red and silver spray paint and then had some fun in the backyard. I haven't gotten around to using them in any arrangements or containers yet, but I think they look pretty neat already. I tried some other seedheads too, but the alliums were my favorite.
~
Related posts:
Friday, November 28, 2008
Amaryllis, Winter Containers and Christmas Decorations
 Over the past two weeks, traffic on my blog has turned to winter containers and Christmas decorations. The only thing that I have done thus far is plant my amaryllis (for a prior post on growing them, click here). This picture is from a couple of days ago and the bulbs should be blooming around Christmas.
I haven't gotten around to the winter containers or Christmas decorations yet, but will be sure to post about them in the coming weeks. For those of you who have already moved on to those activities, here are two posts from last year that you may find helpful:
1. Container Gardening: Winter Containers
2. Christmas Decorations from the Garden
Thursday, November 27, 2008
Happy Thanksgiving: A Gardener's Thanksgiving Day Centerpiece
Today's centerpiece was harvested from my garden: broom corn; hickory and clethra leaves, previously soaked in glycerin and water; and Molina grass, for the binding.
~
~
I give thee thanks, O LORD, with my whole heart; before the gods I sing thy praise; I bow down toward thy holy temple and give thanks to thy name for thy steadfast love and thy faithfulness; for thou hast exalted above everything thy name and thy word. On the day I called, thou didst answer me, my strength of soul thou didst increase. All the kings of the earth shall praise thee, O LORD, for they have heard the words of thy mouth; and they shall sing of the ways of the LORD, for great is the glory of the LORD. -Psalm 138:1-5
Tuesday, November 11, 2008
Perhaps we garden bloggers can help remember our veterans and war dead by posting a picture of a poppy today?
 Many years ago, on my first trip to the U.K. during this time of year, I was struck by the fact that everyone from all walks of life wears artificial poppies in honor of those who died at war for Remembrance Day or Poppy Day. I later learned that these artificial poppies are sold as an annual fundraiser by the Royal British Legion, a charity dedicated to helping war veterans.
~
According to Wikipedia: "The poppy's significance to Remembrance Day is a result of Canadian military physician John McCrae's poem In Flanders Fields. The poppy emblem was chosen because of the poppies that bloomed across some of the worst battlefields of Flanders in World War I, their red colour an appropriate symbol for the bloodshed of trench warfare. A Frenchwoman, Anna E. Guérin, introduced the widely used artificial poppies given out today."
~
In the U.S., we celebrate Veterans' Day today for the living and reserve Memorial Day in May for the dead. Unfortunately, we do too little--we do not wear poppies or pause for two minutes of silence at eleven o'clock--on both of these holidays to truly celebrate, remember, or honor those who served and returned or those who died. Fortunately, Zoe over at Garden Hopping helped me to remember this holiday today with a picture of a poppy and this poem: Garden Hopping: Lest We Forget.
Sunday, March 23, 2008

Saturday, December 22, 2007
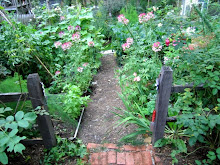
Christmas Decorations from the Garden
When decorating our home for Christmas, I try to bring some of the garden indoors. Below are some examples.
In the first picture of the staircase, I have paired some of my Ballerina and Dog Rose hips with the Princess Pine I purchased from my local nursery and the Leland Cypress clippings from my backyard.
In the second picture of the chandelier, I have placed additional Leland Cypress clippings.
Sunday, December 02, 2007
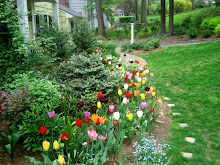
Container Gardening: Winter Containers
Yesterday, before today's snow, I replanted all my planters in the front garden for the winter. I love having something beautiful to look at when most of the garden is sleeping. For inspiration this year, I looked at some photographs I took at the Missouri Botanical Garden (http://mobot.org/) last winter.
The first pot has a yellow twig dogwood as its base. From there, I added boughs of white pine and dried hydrangea blossoms from a Pee Gee hydrangea in the garden. 
On the front porch is an urn whose plantings change every season. For winter, I have cut branches of winterberry surrounded by dried statice and white pine branches. Also, added are some large pine cones from a collection my husband and I have gathered over the years.
Near the lamp post is a small pot atop a column which has Douglas fir clippings, some faux winterberries, and pine cones. Since this pot is in a more exposed position than the one on the porch, in the the past I have found that real winterberries do not hold up as well.
The last pot I did is in front of the living room. In the center of the pot are branches cut from a red twig dogwood surrounded by more Douglas fir branches. A few pine cones were added also. 
The pots will add interest to the garden until spring comes and are easy to do. You can use cuttings from your own garden, buy some from local nurseries, or from White Flower Farm (http://www.whiteflowerfarm.com/) who sells a wonderful 14 pound box of winter greens.
Subscribe to:
Posts (Atom)
Blogflux


